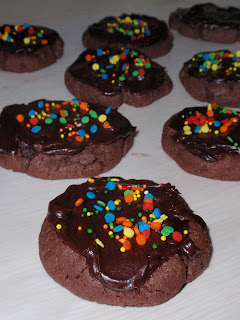
 It's no secret that I love cookies and what's better than having them freshly baked? With little to do around town, D and I set off on an adventure in cooking. I should mention, baking is about the only type of cooking I successfully manage. There were ups and downs, but the cookies were always quickly consumed.
 Our first batch was beautiful and scrumptious, but far from perfect. We used butter cake mix and to make some cake cookies similar to the

funfetti cookies I've previously made. We combined the batter with 2 eggs and 1/3 cup of vegetable oil. Everything was looking great. Thinking it would be fun to do rainbow cookies (similar to the cupcakes), we sought out the food color. We kept it simple with green and yellow, thinking at least it would be blue if the colors did mix. But surprise! The colors held together with no hint of blue anywhere.

Lesson #1 Dyed cookie dough colors do not blend.
D and I had a blast mixing the colors and forming our cookies, but I did find that the texture was more like play dough than cookie dough. It seemed like too much oil, which could be explained by the addition of food coloring.
Lesson #2 Add less oil to your cookie dough to compensate for the addition of food coloring.
Our cookies also seemed to spread quickly while in the oven, likely due to the excess of oil. Some time in the fridge might have made the dough easier to handle and prevented such quick flattening.
Lesson #3 Be patient. Let the cookie dough sit in the fridge for 10-15 minutes before sheeting it up.

As you can see, our cookies were large and very thin. They
 tasted great, but lacked the fluff of most cookies.
For icing, we decided to use the Pillsbury Easy Frost No Fuss Frosting again after they great results from last time! The icing gave us lots of control to create a wide array of designs, but a lot of the cookies ended up with too much icing. In some instances, the layer of icing was thicker than the cookie.
Lesson #4 Use the classic icing from a can and spread it on, so as to better control the amount of icing on each cookie.

Although the cookies weren't ideal, they will still delicious and gone within a matter of days. Not to mention, I learned a lot from them. Isn't that half the fun of baking? Discovering what works and what doesn't?

Well, a few days later, D and I decided to give the cake cookies a second go utilizing everything that we had learned. But this time it was all about the chocolate.
We used Pillsbury Devil's Food chocolate cake mix for the cookies and the funfetti chocolate fudge icing. And yes, it was nearly a death by chocolate.

We didn't add any food coloring this time, so there was no need to adjust the oil. We simply combined the ingredients to a doughy consistency and let them sit in the fridge for 10-15 minutes.
After chilling, the dough was much easier to work with. We rolled small balls and flattened them slightly with the spoon. Fifteen minutes later at 350 degrees, we had beautifully fluffy cake cookies.

Then after the appropriate time for cooling passed, we had gorgeous cookies!

We couldn't have been happier with the results this time around. Not only were they tasty, but they were everything a cookie should be, including fluffy.

Give this basic recipe a try if your ready to turn your favorite cake into some yummy cookies.
Compile ingredients: Pillsbury Cake Mix, 1/3 cup oil, 2 eggs, icing
Combine ingredients into a yummy cookie dough.
Sheet them up.
Watch them like a hawk in the oven.
Ice the cookies after appropriate cooling time.
And, please, whatever you do, don't make my mistakes! Have fun!

Amanda Rose,
ReplyDeleteYou so need some recipes from me.
Pati
Thanks for stopping by my blog. These look great! I never thought about decorating them! I bought a cherry chip cake mix to try them with...maybe with cherry icing on top?
ReplyDeletePati: What are you waiting for? Send them my way!
ReplyDeleteMelissa: That sounds delicious! I'm drooling just thinking about it!
Super cute!! Cookies should always be fun like this!
ReplyDeleteLaura
Thanks Laura, I completely agree! What's the fun in making them, if they're is no fun!
ReplyDeletethose cookies looks so fun to make and to eat. Beautiful :-) tq for leaving a comment :))
ReplyDeleteThanks for stopping by my blog.. yours is cute too :)
ReplyDeleteThanks for visiting my blog all the way over in Africa ! Your cookies looky delicious .... especially the chocolate ones. Yum :)
ReplyDeleteZurin - Anytime, thanks for stopping by!
ReplyDeleteAstheroshe - Thanks, yours is awesome too!
FoodFunFarmLife - Oh the chocolate ones were to die for, enjoyed your blog!